Thursday, March 31, 2016

Cuppycake Birthday Wishes

Off late, images of cards keep coming everytime I close my eyes. My mind is always thinking of crafting!!

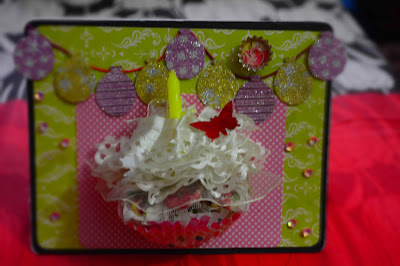
One such time, When I closed my eyes, I saw a 3D cupcake card. This card is a result of that imagination :)


For this card, I've used the following items:
1. Balloon Punch and Butterfly punch
2. Pattern Papers - DCWV Cherry Limeade Stack
3. Cupcake Wrapper
4. Trims and Ribbons
5. Glitter Washi Tapes
6. Candle
7. Pink Sequins
8. Sew Easy fancy floss
9. Other Embellishments
10. Corner punch
11. Black and White cardstocks

Posting more pics of the card below:


If you like this card or have any suggestions, please leave a comment. It'll be very inspiring to know :)

Linking this to the Lulupu 4th Birthday Challenge:

Grid used - R2 - Balloons, Patterned Paper, Washi Tape, Banner
Made a balloon banner with washi tape and have the pattern papers on the background.


http://lulupu.blogspot.in/2016/03/lulupu-4th-birthday-celebration.html


Linking it to Craft Your Passion: 


Monday, March 28, 2016

Elephant wishes


Here's another card that I made for a birthday.
Twice, when we were going out for birthdays, my husband asked me if I had any cards that we can give. And unluckily, both times I didn't have any card that was ready. That day I decided to make a few extra cards that can be used in such situations.

This card has all my fav elements - Elephants, Balloons and Cupcake :). Posting more pictures of the card below:


I pasted the front panel in a little slanting way to denote that the balloons are flying up on the other side (The side without the elephant).


How I made this card:
1. I colored a white card stock with multiple colors of Artistry inks and punched out the balloons.
2. I pasted the balloons and threads on the blue pattern paper with the help of foam tape.
3. Then, I tied the all threads attached to the balloon to make a bow. I found the cute button shaped sticker in my stash and used it over the bow.
4. I them attached the die cut elephant (I had bought it for a baby book I made earlier) in a way that it would look like the elephant is holding the balloons.
5. I then embellished it with a cupcake sticker and Tag. The "Happy Birthday to You!!" on the tag is hand-written.
6. Then I backed it up with a pink pattern paper from my first ever paper stack - DCWV Cherry Limeade

Linking this to the Lulupu Birthday Challenge:
I have used all the elements in C1 - Tags, Balloons,  Cupcake and Hat (The crown on the elephant's head)

 http://lulupu.blogspot.in/2016/03/lulupu-4th-birthday-celebration.html

Friday, March 25, 2016

Happy Birthday - Card & Tag


This card was made keeping in mind the Lulupu's Birthday challenge happening this month. I loved the Birthday grid, this being the first "Grid-wala" challenge that I am participating in. It was also the birthday of my daughter's best friend (who turned 3) and a colorful card seemed like an apt gift for the little one.

I made a card, an envelope and tag combo for the little one Here are more pics of my card:


I have used Artistry inks to colour the card with Papericious Blending tool and loved the effect. It spreads perfectly and reacts awesomely with water. I have read, watched and used Distress Inks and I feel that these two Indian brands are nowhere behind.

I stamped the flowers and fussy cut them. I then colored them with Artistry inks mixed with water and attached matching buttons on each one. Then I applied glitter and Glossy accent on each flower before attaching it to the card base. The Happy Birthday sentiment is stamped with Itsy-Bitsy stamp and colored with Glitter pens.

Linking this card to the challenges:

1. Lulupu 4th Birthday Grid Challenge - C2 - Glitter, Pattern Paper, Flowers and Buttons


2. Peek a Boo Designs Challenge - Rainbow with Clouds


Altered Wedding Card and Tag


Inspired by Dr. Sonia, I decided to try my hands on altering a wedding invitation into a birthday card. Since I'm on a strict budget (which I always exceed :p), I try to limit my purchases to necessities every month. Though the embossing tools have been on my list for quite long, it hasn't reached my craft table yet!! Hopefully next month :)

I have always been attracted to Heat embossing. When I came across this wedding card, it was super pretty and had a design very similar to it. That inspired me to alter the card to make a card and tag.


This card is super bright and I love how it turned out. The pics here do not do justice to how pretty the card actually looks. 

Items Used:
3. Punched Butterflies
4. Pattern paper 
5. Scissors and cutter

Linking it to the Peek-a-Boo Designs challenge and Dr. Sonia's 5M pageview celebration:

1. Peek a Boo Designs - Rainbow with Clouds

2. Dr. Sonia's 5M page views celebrations